growing
BROMELIADS
outside in the UK
 |
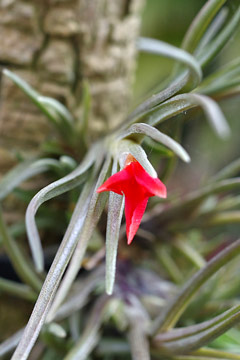
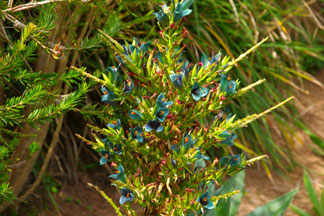
Billbergia
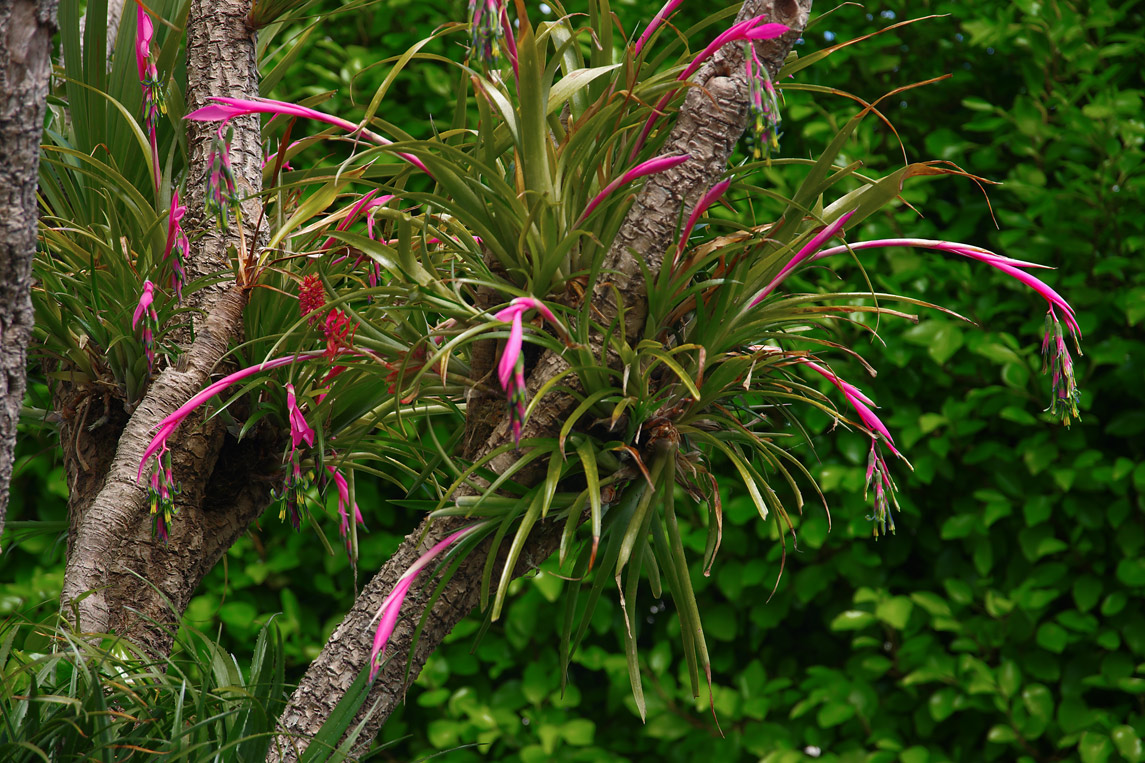
nutans growing on a Cordyline australis at Southern
Comfort. Billbergia is perhaps the most rewarding epiphyte to grow in the open; it is also not difficult and requires very little attention when established. There is no better way to grow Billbergia in the garden: its flower stems must be given freedom to arch in a natural way. The cordyline also hosts epiphytic Achmea, Tillandsia, Fascicularia and Echeveria rosea. In order to maintain the best foliage colour and to prevent excessive drying out grow them shade or partial shade. |
General
The Bromeliaceae or the bromeliads are a group of plants whose most well-known representative is the pineapple. There are over 2000 species of bromeliad and all except Pitcarnia feliciana are native to the warmer parts of the Americas. Most are epiphytic (growing on but not parasitizing trees) herbaceous perennials with strap-shaped leaves and form rosettes as they grow. They are generally all fairly resistent to long dry periods and some are robustly drought resistent. In some species the rosettes catch rainwater and act as reservoirs for the plants' use; however, these reservoirs are often also used by various creatures - small frogs, toads, mosquitoes - in order to complete their life-cycles. Bromeliads often have strikingly colourful and eye-catching blooms with extraordinary shades of red, blue and purple.
While many bromeliads have become well-known as house plants it is not generally appreciated that several species can be grown very successfully outside in the milder parts of the U.K.. I will describe requirements of species which I have grown in the garden at Southern Comfort and mention others which might be worth trying. My experience is obviously limited both to the specific natural conditions of my garden and to the small range of experimental conditions I have been working with. In other localities some modifications or tweaking of conditions may be necessary.
Tillandsias are the aristocrats of exotic gardening in our temperate climate. Unfortunately, the choice of plants we can grow is limited and although some additional suitable species will become more widely available they are unlikely to be numerous. The ones I describe here are really 'top of the range' garden perennials which undoubtedly provide the final polish to a mature exotic garden.
Tillandsias
Tillandsias are often known as 'air plants'. The impression once given by slick plant salesmen is that tillandsias survive on nothing more than the presence of air and an occasional misting. In plant centres they are often sold attached by means of hot glue guns or silicone mastic to tasteless ornaments or to other bits of debris. Sadly, I get the impression that they rarely last long in the home - even in the presence of air and subject to misting. It is not inconceivable that they might retain at least their appearance for longer in the total absence of air.
 |
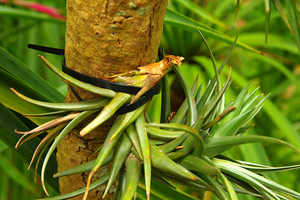 |
| Tillandsia aeranthos flowering outside at the end of June 2011. This plant is growing on a Cordyline australis. In 2560x12440 monitor resolution this flower is roughly natural size. | How to attach a tillandsia with cable ties. Use at least two ties, attach so as to 'hook' the plant in at least two places and attach the plant upside down. The photograph shows how, after only one season, the plant has reorientated itself to the vertical. |
I must admit that my first experience with tillandsias involved a visit to a (probably) mediocre plant centre, buying some assorted species loose, attaching them carefully with wire to a piece of decorative bark, standing them close to a window and misting them according to the required regime. This was quite unlike my general approach to plants and it is not surprising that they did not last long. My second try was different. With little trouble I managed to find out which species were the most robust and most likely to survive outside in our climate. I bought the plants directly from a supplier1 who, incidentally, informed me that very often plant centre staff neglect tillandsias to such an extent that they may already be past hope at the moment of sale. I then grew my new batch of tillandsias in the open.
The species chosen were T. aeranthos, the similar T. bergeri and T. ionantha. T. ionantha was singularly unsuccessful having been shaken apart by wind and driving rain during the winter months. There are other species which could be tried but they are difficult to obtain here in the U.K.2.
In the wild tillandsias generally grow on trees to which they are attached by means of adhesive roots. Tillandsia roots function only as anchors and not as a means of absorbing nutrients - these are absorbed through the leaves. Ideally, this is the way they should be grown. In practice, however, once a tillandsia rosette matures it is reluctant to put out roots and those which do appear on offsets rarely succeed in attaching the plant to the support. It is therefore recommended that the plant be attached using silicone mastic, hot glue, super-glue, wire, pins, string, rubber bands with wire hooks. I have not found any of these satisfactory: the adhesives soon work loose, pins damage the plant, wire and string apart from being difficult to use both cut into the plant tissue and never hold securely. Perhaps the least unsatisfactory method on the list is the rubber band and hook method - this must be kept an eye on and replaced regularly. By far the most satisfactory method overall of attaching a tillandsia to a tree trunk, although not the most pleasing aesthetically, is to use cable ties (stringing two or more together if necessary) - preferably the type which can be easily undone if necessary (this is sold in good plant centres). Cable ties do not damage the plant, they hold securely and they can be adjusted if necessary. Eventually with luck some roots may find they way to the support.
When attaching tillandsias I ensure that the plant is upside-down in order to ensure that drops of water do not find their way into centre of the rosette and cause rot or, just as likely, to gather at the very base of the plant with a similar result. The plant will eventually grow into a natural position where it will
 |
| Tillandsia bergeri attached to a Cordyline australis trunk. The most effective way of attaching tillandsias to tree trunks is to use cable ties. In the wild tillandsias grow not only on trees but on rocks, roofs and even telephone wires. Although this species is reputedly the easiest to grow outside in the U.K. I have not noticed any problems with its close relative, T. aeranthos which seems equally hardy. |
In many case this will suffice and the plants can be left to their own devices. They will gradually bulk up and, during early summer, flower. Some may form a balls resembling birds' nests while others will branch and lengthen. Eventually, offsets or parts of stems can be removed and started off independently. I have no experience of using seeds in the propagation of tillandsias (or indeed any other bromeliad) but at this stage I see no reason in principle why seed propagation should fail.
The question of choice of support tree for a tillandsia is more difficult than might at first seem - especially if we are to satisfy all (or most) of the criteria mentioned above. Normal leafy trees - both deciduous and coniferous - have disadvantages, at least in the U.K.; they have low light levels close to the trunk, they may prevent sufficient moisture reaching the plant and, by no means least importantly, may not display the tillandsia adequately. Dave Poole, who gardens in Torquay, has had some experience with the growing of tillandsias outside. Although he does not explain why, he attached his clump of T. bergeri to the trunk of a Yucca elephantipes3. This type of support eliminates all of the above problems. Here, I chose a Cordyline australis which has a similar growth pattern. One word of warning: whatever method you use to secure the plants to the support do keep an eye on them and make sure that they are always firmly attached - they are all prone to dropping off, especially after windy weather.
It is probable that outdoor tillandsias react favourably to a degree of spraying/misting and foliar feeding. During prolonged dry periods I give them a hose-pipe soaking and occasionally spray-feed them using a high potash fertilizer at a fraction of the recommended dilution. I have not experienced any over-feeding problems (yet!) but I would advise to err on the side of caution and ensure that the concentrations of fertilizer are low.
Over a period of several years we have observed that Tillandsia bergeri is both more vigorous and more floriferous than T. aeranthos. It tends to form a neat spherical clump which soon surrounds the trunk to which it is attached. The size of the clump on our Coryline australis after six or seven years has managed greatly to exceed the size of a football - it is now a good 15" (38 cm.) in diameter. I have observed that the rate of growth of a clump of Tillandsia is related to the degree to which it flowers. After flowering rosettes often split into four or more new branches - non-flowering rosettes are definitely less enthusiatic about splitting. However, it is not fully clear to me what affects flowering in the first place but I suspect that both high light levels and high potash fertilizer (as mentioned above) are important factors.
Other hardy Tillandsia species
 |
| Tillandsia albertiana growing on a Cordyline australis. This tillandsia is a fast grower and readily attaches itself to the host with its adhesive roots. |
Three other Tillandsia species have been recently brought to my attention: T. albida, T. albertiana and T. duratii. They are reputedly at least as hardy as T. bergeri and T. aeranthos. I began to grow them in May 2018 and because as I write it is December 2019 it is still too early to comment. The foliage of T. albida is very similar to that of the above two but its flowers which are white to light green give a paler overall effect. Colour is provided by the crimson bracts. I expected it to flower in 2020 but was disappointed. It also appears to be slightly less vigorous than T. bergeri. Also in contrast to the other two species T. albida is less reluctant to produce adhesive roots although none of my three plants has as yet anchored itself to its host strongly enough not to require any artificial support.
 |
| Tillandsia seed is copiously produced, germinating easily where it finds appropriate conditions. |
The foliage of T. albertiana is quite different: the leaves are narrower, greener, more densely-packed and generally somewhat untidy-looking. This species has been faster-growing than the others, has already flowered twice in 2018 and soon produced enough roots to anchor itself firmly to its supporting trunk - all artificial support was soon removed and the plant is now able to take its exposed position in its stride. Its small and solitary (in my case, at least) flowers are a striking vermilion-scarlet which makes them visible from a long distance. So far it shows promise.
T. duratii is different yet again. It is a large plant and finds support amongst branches in a manner similar to a South-American sloth. The ends of its leaves curl around, forming firm hooks from which the plant hangs. As it grows new leaves reach out and pull the plant upwards. It does not grow any roots. In this respect it is a bit like a large solitary T. usenoides but, unlike its cousin, it is very slow-growing and will take many years to make even a modest clump. It is also relatively expensive and it can be painful to lose a large specimen. None of this makes it an ideal plant to experiment with. My two plants are small and unlikely to reach flowering size any time in the near future. To grow T. duratii it is probably best to have it firmly secured with wire rather than to let it scramble around at will.
Large clumps of T. duratii do not fail to impress but its reluctance readily to branch will frustrate and eventually, when it flowers, it may disappoint. However, despite my usual care (generally sufficient but never obsessive) my plants did not grow satisfactorily nor did they survive more than two winters. Rot was the culprit - even in the greenhouse.
For additional information about growing tillandsias outdoors in the U.K. see 'The Frustrated Gardener'4.
Tillandsia seeds and germination
 |
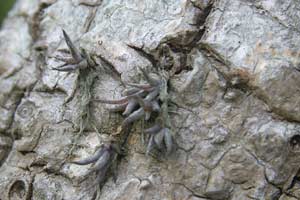 |
| Tillansia bergeri - two or three months after being attached to a tree trunk the seeds are showing the first signs of germination. | After two winters (and some losses) the tiny plantlets are beginning to take shape and adhere to the supporting trunk with their own roots. |
After flowering the seed pods of tillandsias burst open to produce a multitude of dandelion-like seeds which in the wild can be dispersed over vast distances by the wind, some eventually finding a suitable vertical niche in which to germinate and grow. The seeds which fall to the ground may germinate but will be unable to grow properly and soon perish. Tillandsia seeds are easy to germinate under artificial conditions - various suggestions can easily be found on the internet. These range from using damp sphagnum moss or tissues to suspended meshes kept moist by intermittent misting. I have not tried any of these methods mainly because of the very slow rate of growth of the seedlings - it is far more effective to propagate Tillandsia from offsets which are regularly produced by most species but especially numerous after flowering. However, one interesting challange is to try to germinate them in a more 'natural' way, that is, outside and on the trunk of a suitable tree or post.
During 2019 I gathered probably several hundred Tillandsia bergeri seeds and, around September time, attached them in batches to the trunks of several Cordyline australis using a small brush. An adhesive was, of course, necessary and I experimentally used a starch-based gum of my own concoction, wallpaper paste, and very dilute PVA. Soon after 'sowing' rain and wind very effectively removed all the seeds attached with the starch-based adhesive and the wallpaper paste. I need not have worried about the PVA inhibiting germination because towards the end of the year green growth became clearly visible. As expected most losses occurred during the first winter and at the time of writing (winter 2022-23) very little new loss was apparent. Survival rates seemed least where both shade and exposure to maximum sunlight were greatest. Dappled shade ensured best survival rates. Even so, I now may have been left with at least one hundred tiny plants. Possibly very much more. During this period the plantlets were largely left to their own devices apart from some hosing and misting during exceptionally dry periods. When misting some very dilute general fertilizer was used.
Billbergia, Aechmea & Fascicularia
 |
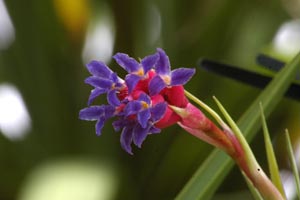
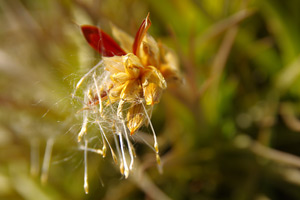
| A Fascicularia bicolor bicolor inflorescence. The bottom of the leaves immediately next to the flower colour up to an intense red which at first sight appears to be part of the flowers. |
These three quite distinct genera can be grouped together mainly because they will grow under similar conditions although in my experience Fascicularia bicolor (the species normally available here) will benefit from the highest light levels we have here in the U.K.. It is also,I suspect, hardier than the other two species I describe here.
The most satisfactory species of Billbergia for our purposes is B. nutans. The commonly available hybrid Billbergia 'Windii' (nutans x decora) is very similar and the two can easily be confused; however, B. nutans is more robust and distinctly hardier than 'Windii' which is more suited to a conservatory or greenhouse. 'Windii' has chunkier flowers and is also somewhat chunkier all round. There is also a variegated form which I have assumed is B. nutans but possibly is not. This form which is a strong grower seems hardy enough here and grows well in light-shade where its foliage is probably at its best but has rather inelegant and disappointing blooms which differ from the main type. It is definitely not one to be grown for its flowers. I was given a few clumps of it by Ray Hubbard of Hill House; he had previously tried to identify it but with limited success.
The Florida Council of Bromeliad Societies lists over 40 species and over 440 Billbergia cultivars5. Very little of this material is available in the U.K. but in the course of time gardeners will no doubt find in this list more plants suitable for outside cultivation.
Billbergia is epiphytic in the wild but will happily grow in composty soil. At Southern Comfort we mainly grow it in a bundle of sphagnum moss and compost and secure the bundle in the crotch of a Cordyline australis, poke it into a crevice in a vertical rock face or well into the fibrous leaf axil pocket of a Trachycarpus. Grown epiphytically, the plant's pendulous flowering stems are displayed to perfection (see photograph at the top of this page) whilst the light shade provided by the the foliage of the supporting plant will ensure the best colour for the billbergia's leaves.
B. nutans grows particularly well on Trachycarpus palms but it must be given a good start. therwise it has a tendency to dry out and even work loose. Once established the roots work their way into the fibres of the trunk and the whole clump becomes extremely secure as well as being able to trap the required moisture. In case of doubt the new clump needs to be surrounded with some sphagnum moss (with optional peat or soil-less ericaceous compost) and watered wellusing a hose-pipe. The area around the plant should be kept moist until it is well established. There is almost no risk of waterlogging leading to rot in these circumstances. Time will tell how long the fibres of the palm will last; after five or six years' growth there still is no visible change in the fibres of the Trachycarpus fortunei which host the billbergias.The pocket behind the leaf base of the palm is a idealplace to plant a billbergia which, if conditions are right, will quickly find its way through the fibres and clothe large sections of the trunk producing a spectacular fountain of flowers in late spring.
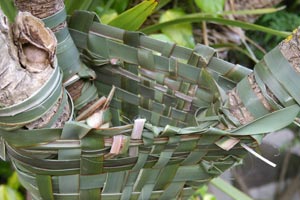
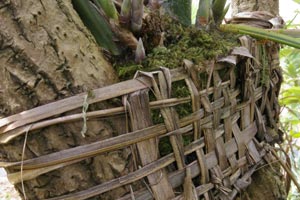
Getting billbergias going on a cordyline is a little more tricky. Merely plonking a billbergia bundled with sphagnum and compost into a crotch and hoping for the best is to be over-optimistic. The whole package will drop out sooner than expected. However, if a 'basket' is woven out of suitable material the billbergia can simply be 'potted' into it. Choosing a triple crotch is far better than using the more common
 |
 |
A phormium leaf 'bromeliad basket' woven around a triple crotch of a Cordyline australis (above: newly made, top right: recently planted with Billbergia nutans and Aechmea recurvata, right: a similar basket after one season). Near the bottom right of the bottom picture a partially disintegrating basket with a flowering billbergia can be just seen. The planting medium is ericaceous compost and hanging basket quality sphagnum moss. This planting medium is notoriously hydrophobic when dry. In order to re-wet it a hose-pipe and patience are both required. After two seasons or so the basket will begin to disintegrate but by that time the clump would have increased in size and its roots would have penetrated the whole bundle and anchored it well into the crotch of the supporting tree. At this stage the clump can be left to grow on, divided, or even some new phormium leaves used for additional strength if required. |
 |
Over time the basket, if made of organic material, will rot. At the same time the roots of the billbergias will find secure anchorage points at the surface of the cordyline. An added bonus is that the cordyline 'thinks' that it is being air-layered and itself sends out roots which entwine with the billbergia roots. The whole bundle should not be allowed to stay too dry for too long otherwise the cordyline roots may die and weaken the anchorage; the billbergia is probably more resistent to such dry conditions although it too will probably fail if left dry for too long.
A variety of material could be used to weave the basket: rope (either natural of synthetic fibres), string, wire, plastic tape, leaves, plant stems and so on. Synthetic fibres have the advantage of being resistent to rot and some colours and textures of tape may be quite acceptable. However, I opted for Phormium leaves which I have in vast quantities. They are best used fresh, split and the thickest and thinnest ends cut back. They soon loose their colour but continue to look attractive for a couple of seasons before beginning to disintegrate. If phormium is not available Cordyline leaves would probably make a suitable substitute - but they may rot sooner. Even before the plants attach themselves solidly.
Both Aechmea recurvata and Fascicularia bicolor can be grown in the same way as Billbergia nutans. Indeed, this basket method can be used for epiphytes other than bromeliads. I suspect that cymbidiums, in particular the more robust C. tracyanum, can be grown in this way and I am currently trying this out. For further information refer to the Orchid page where I also describe a rope-woven basket on a single crotchless trunk.
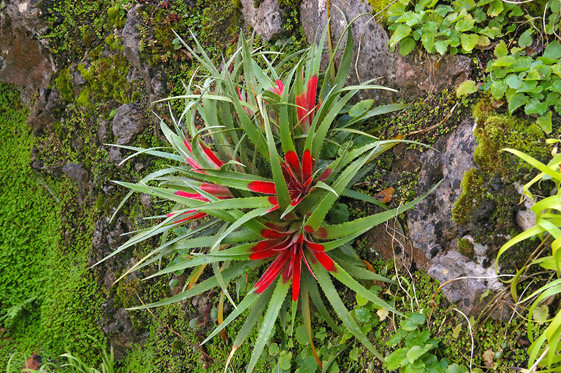
Fascicularia is slightly easier than Aechmea recurvata because it is comparatively more drought-resistant and can be positioned where billbergias and aechmeas would struggle. Fascicularias are particularly effective on steep rock faces both in full sun and in semi-shade. Starting them off in such a position sometimes requires 'extreme gardening'. On our small rock face holes had to be drilled and pegged. Galvanised wires designed to hold fascicularia bundles were then stretched between the pegs. When all was secured one whole season was required for the bundle to coalesce with the rock and for the plant to look established. Wires can eventually either be left or removed as appropriate. The fascicularia clumps on the photograph are growing on a limestone 'cliff' close to the north side of the house. There is very little soil on the rocks where they are growing. Despite these apparent 'difficulties' the plants appear very healthy, are an attractive deep green colour and show no sign of iron deficiency or chlorosis.
As well as growing it on rocks as a lithophyte we have Fascicularia growing as an epiphyte (on a Cordyline australis) in sun, semi shade and shade. We also have it growing in the ground and, perhaps surprisingly, without any soil at all; in the latter situation it is suspended in an empty plastic pot. In all these positions it performs as expected provided it is misted (very occasionaly will do) with a well diluted solution of plant nutrient. In all it is a very adaptable plant - the only place I have not tried it in is the pond...
 |
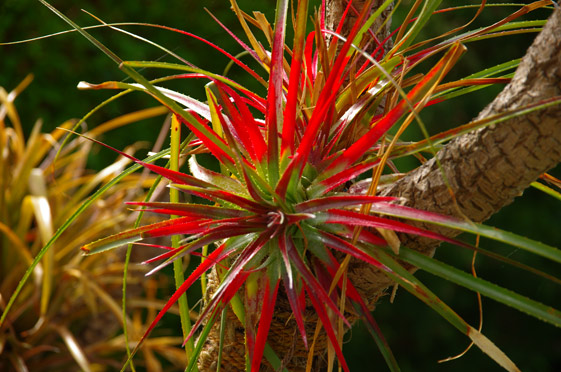 |
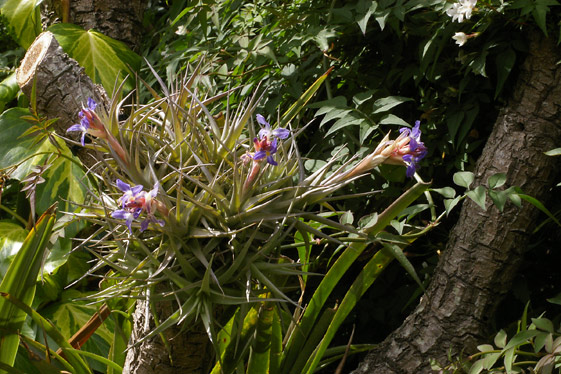
| A clump of Fascicularia bicolor bicolor quite established on a near vertical limestone rock surface. Metal pegs and wires were initially used to anchor the plants. One season after 'planting' and by this time the clump was already very firmly attached to the rocks. The leaves begin to colour up some weeks before flowering and continue to please for some time after. The flowers themselves rarely last longer than 24 hours. | Fascicularia bicolor caniculata after two seasons of growth on a Cordyline australis The clump was started off in a small rope basket of peaty compost and very rapidly established itself. Like the F. bicolor bicolor (left) it is at the pre-flowering stage. |
In its native habitat in Chile Fascicularia grows both on trees and and on rocks. So fascinated was the late Christopher Lloyd by this plant that he grew one in a house gutter at Great Dixter. I suspect that he was wise enough to grow it at the top end rather than at the downpipe end.
Fascicularias have for many years been used in parks and in other municipal plantings in the milder coastal areas especially along the south and south-west coast. Here they often form huge clumps and give the surroundings an informal, wild and exotic air. Their hardiness in this part of the U.K.is in no doubt. This and their most impressive blooms make them an ideal 'starter' bromeliad for the garden. The simplest way to grow them is in not too rich well-drained soil with plenty of light. They will, however, still grow and flower in situations where there is little or no sun but plenty of reflected light - like on the north side of a white-painted house or wall. Some of my neglected ones have even grown and flowered without pots, soil or tree trunks. However, my preference is to grow them on vertical surfaces. I believe this sort of thing makes a garden more interesting.
Botanically, Fascicularia bicolor is divided into two subspecies: F. bicolor bicolor and F. b. canaliculata (previously known as F. andina and F. kirchhoffiana respectively). At Southern Comfort we have several clumps of ssp. bicolor; The subspecies canaliculata is hardier, has less attractive foliage with thinner, canaliculate (not surprisingly given the name) leaves and is a smaller plant. In my experience, it is also a more profuse flowerer. If in doubt, choose F. b. caniculata.
Puya
|
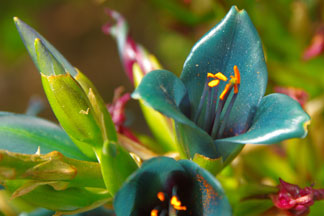 |
| Puya berteroana inflorescence. Photograph taken in the garden at Coleton Fishacre. | Puya berteroana - individual flower. This plant stops people in their tracks. |
Puyas are large, xerophytic, terrestrial bromeliads. They are native to the high altitudes of the Andes where they are able to withstand both drought and freezing temperatures. Their greatest enemy on the garden is winter rot and therefore some shelter from the rain and very well-drained soil are top of their requirements. Although there are well over one hundred species of Puya availability is limited. The RHS Plant Finder list 10 species available in the U. K. which is something like 6% of all known species. I have found that two species, each most impressive in its own way, are more or less easy to find: P. berteroniana (berteroana) and P. chilensis.
P. berteroana is known for its remarkable flowers - an 'unearthly shade of metallic turquoise' said the late Will Giles. It most certainly is extraordinary and having seen it once only is never to forget it.
Puya chilensis is one of the dominant features of the garden on Tresco. Its flowering stems (up to 5 metres) tend to be taller than those of P. berteroniana and its flowers are a dullish yellow.
At the time of writing (August 2016) our puyas are now in their sixth season and they have not flowered. The positions in which they have been planted ensure maximum light (sunlight for almost the whole day), a south-facing slope, and near-perfect drainage. So far conditions seem to have been favourable because the plants have put on considerable growth since planting.
Puyas, however, are not for everybody. In fact, for many years I avoided them like the plague after having received a nasty cut from one many years ago. The leaves of puyas are possibly the most vicious in the plant kingdom: they are very sharp, very numerous, very well positioned for attack, mean-looking and, worst of all, they are inward pointing; this feature ensures that once caught up in them painless escape is difficult. Since the plants grow very large - leaves up to one metre in length - the potential for damage is significant. It is said that in their natural habitat puyas ensnare animals and even birds in such a way that inevitably leads to a painful death. The remains of the dead animal then serve to enrich the usually poor soil in which the Puya is growing. The carnivorous pitcher plants and Venus' fly-traps are a kindergarten in comparison to a puya. Eventually, however, when the Mediterranean section of the garden was developed we decided to include these two species in the planting scheme. I also invested in a pair of strong gardening gauntlets.
Other genera and species
There is not a large number of other garden-worthy bromeliads which I consider may be worth trying. Although there may be many species involved - sometimes the species are so similar visually that, unless you happen to be a collector, it may make sense only to grow the most suitable or most attractive member of the genus - there are only a few genera which I have managed to identify.
1. Neoregelia carolinae
This epiphytic species is from Brazil; there are some attractive varieties which may be slightly less hardy than the species.
2. Ochagavia carnea
The RHS Plant Finder list this and 3 other species of Ochagavia; this genus is very closely related to Fascicularia and the plants are similar and probably grow in similar conditions. O. carnea is native to Chile.
3. Dyckia
The hundred or so species of Dyckia occur in Brazil and surrounding countries and they grow in similar conditions to Puya. Like puyas, they are large bromeliads (although some are much smaller) and often armed with vicious spines. The rosettes of the Dyckias are very varied and some species are extremely attractive; the flowers, however, lack striking colours and are less impressive than those of other bromeliads. We have a couple of the smaller species growing in pots in the greenhouse.
4. Tillandsia usenoides
 |
| Tillandsia usenoides flowers usually pass unnoticed because of their small size. |
This tillandsia is commonly known as Spanish Moss and is quite unlike any of the other Tillandsia species. I often explain to friends and visitors that it is neither a moss nor is it particularly Spanish although it may be somewhat more Spanish than mossy. It hangs in festoons from trees in the damper parts of the southern United States and other places. Reputedly hardy in the U.K. but I have not had any great success with it outside: the wind, the driving rain, the birds, my neglect - all manage to ensure that the colony decreases in size during the colder months of the year. I have never found this plant madly exciting anyway. I grow this curiosity in the greenhouse and give it a regular misting with low strength plant food. Occasionally I dunk the festoons in a bucket of rainwater; thisensures that moisture finds its way into all parts of the plant - leaving them for in water for several hours will do no harm too long may cause rot to set in. The festoons increase in bulk steadily and can be carefully separated into smaller sections when required.
Tillandsia usenoides is generally not thought of as a flowering Tillandsia. My clone at least seems fairly floriferous; the flowers, however, are hardly noticeable - they are tiny, green and have to be looked for very carefully and certainly not the sort of flower to impress your friends with.
Over the years the festoons in the greenhouse became enormous and outgrew their welcome. Recently, most of them were transferred outside to various locations and monitored. The places where they looked best proved to be unsuitable and the winter months proved invariably fatal. However, when placed in a somewhat sheltered, but well-lit and well-aired corner the plant surprised me by bulking up rapidly and overwintering with success.
5. More hardy genera and species
In the search to find more cold-tolerant the report of the Sarasota Bromeliad Society is probably as good a starting point as any. Their list of bromeliads which are 'hardy with survival and with little or no damage to 26°F (=-3.3°C) for several hours' runs to almost 300 species and cultivars. It includes the additional genera Hetchia, Bromelia, Guzmania, Nidularium (all species and cultivars), Quesnelia, Vriesia (most) as well as a number of Aechmea species, most Dyckia species and all 20 of the Puya species listed. A large number of Tillandsia species were included in this list. Out of these 300 bromeliads over 120 were listed as hardy to 20°F (=-6.7°C)! However, matters are not that simple. Firstly, information gathered on cold hardiness in the United States is not indicative of how the plant will behave in the U.K. - it is merely a rough guide. Secondly, there is a some conflicting evidence presented (of which the author is aware) which shows many species listed under more than one category of hardiness.
My experience with bromeliads shows that the hardiness data are indeed little more than a starting point for experimentation. For example, Tillandsia aeranthos, T. bergeri and T. cyanea are all listed as hardy to -3.3°C. However, in recent years we have had prolonged cold winter spells of -3 to -2°C with lows of down to -5°C. T. aeranthos and T. bergeri were both unaffected whereas T. cyanea was looking distinctly unhappy at 0°C and failed miserably at the first touch of frost (we tried several times in different locations). T. ionantha — listed as hardy down to -6.7°C — was soon damaged by wind, rain and low but not freezing temperatures long before the mercury dropped below zero degrees centigrade. Perhaps the maritime climate and the closeness of the sea at Southern Comfort creates difficulties for some bromeliads and not others?
1. Key Essentials(airplants)
http://www.keyessentials.co.uk/,
Bromelien Westermann (all bromeliads - German supplier) http://bromelien-westermann.eu/.
2. See report of the Sarasota Bromeliad Society "Cold Sensitivity of
Bromeliads" http://fcbs.org/articles/cold_sensitivity_of_bromeliads.htm.
3. http://www.growingontheedge.net/viewtopic.php?f=2&t=538 & http://www.uk.gardenweb.com/forums/load/ukgard/msg1022405430858.html.
4 .https://frustratedgardener.com/2017/08/20/getting-some-air-plants/.
5. http://fcbs.org/pictures/Billbergia.htm.